Import products via CSV
Transcript
Helpful Links
Importing Products Into Your New Store
To move products from another store into your new store, you can use the import feature in the product catalog.
Select the platform you wish to bring those products from, then follow the instructions below.
Prepare Your CSV File
Native eCommerce only supports
CSV files, so if your spreadsheet is currently saved as a Numbers or Excel file, you’ll need to export it as a CSV before importing.
Next, double-check that all your fields (column names) are properly formatted to match the required structure.
If you’d like to see an example, you can download a
CSV template to review the recommended format before uploading your data.
Importing Your Products
When you're ready, upload the CSV.
If any products in the CSV file already exist in your store, you’ll be prompted to confirm whether you want to overwrite those existing products with the ones from the file.
When you're ready, import your products.
After the Import
If the import is successful, a confirmation message will appear to let you know it was completed successfully.
Be sure to review your product catalog to confirm that all products and their associated categories were imported correctly.
Help Center
Export products from external store
Tips & Troubleshooting
Transcript
Helpful Links
Google Sheets
File Not Selecting During CSV Upload
If you’re trying to upload a CSV file but it appears greyed out, it’s likely that the file hasn’t been saved as a CSV yet.
You'll need to make sure you
export the file as a CSV, otherwise the system won’t recognize it, and you won’t be able to select it for upload.
To avoid import issues, also make sure not to include table names in the CSV file.
Export to CSV
Important
Using Google Sheets? Export your file as a CSV by selecting:
File → Download → Comma Separated Values (.csv)
TRANSCRIPT
Check the First Row of Your CSV
The first thing to check is the first row of your CSV file.
If that first row shows the name of your table, for example, something like “products-export," you’ll need to delete that row.
Your first row should contain only the column headers - things like Product title, Price, Description, and so on.
So, if your table name appears as the first row and your headers are showing up on the second row, simply remove that top row before importing your file.
Transcript
Helpful Links
Important
“Unsupported Header: Incorrect Column Name” Error
If you see an error message that says
“Unsupported header” followed by one or more column names, it means those column names in your CSV file need to be reformatted to match the supported headers in Native eComm.
Example of an Incorrect Column Name
In this example, it looks like we have a column named "product-dash-image," which is incorrect and needs to be reformatted.
To fix this, check your header row and make sure each column name follows the correct format supported in Native eComm.
Referencing the Correct Format
According to the CSV Format requirements, this field should be labeled "product-dash-image-dash-url."
So if you notice any other column names that don’t match the proper format, go through the CSV field reference table and confirm that each column name is spelled and formatted exactly as required.
Help Center
Important
Make sure to update the column names in your CSV file, so they follow Native eCommerce’s required format.
For example, if your CSV file has a field named "product-image," check the CSV format requirements table to confirm the header name. In this case, the required header is "product-image-url," so you would need to update it accordingly.
To ensure your column names are set up correctly, you can also download the CSV template and use it as a reference.
Transcript
Helpful Links
Mandatory Fields
Importing Products With Variants
If you’re importing products with variants, it’s important to make sure those rows are formatted correctly.
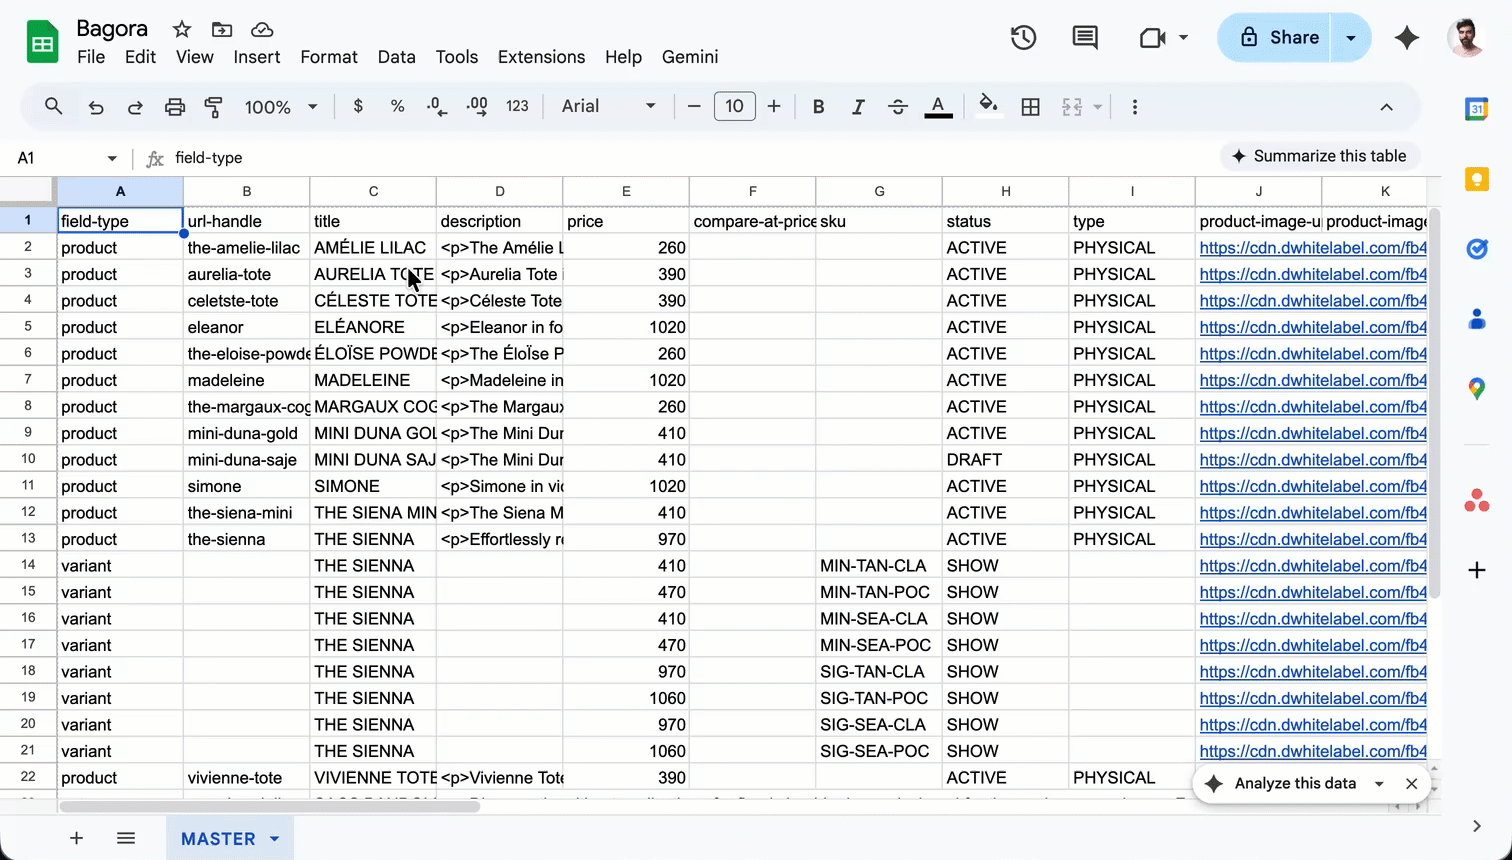
Field-Type Column
The first thing you'll notice is a column labeled
"field-type."
This column only supports two values:
"product" or
"variant."
- For the base product, make sure the value in the column is "product."
- Then, for each
variant of that product, label those rows as
"variants."
Title Field
Next, take a look at the “title” field.
Each variant should have the same title as the main product.
This step is important — if a variant doesn’t include a title, you’ll get an error when you try to import your CSV.
Product Option Fields
The next thing you'll want to look at are the fields labeled:
- "product-option-name"
- "product-option-value"
Each product-option-name field and product-option-value field follows the same naming convention, so make sure every field is labeled correctly according to that format.
Option Values per Variant
You’ll need to be especially careful when adding the product option values.
You’ll notice that all the available variant choices for your product will appear as a list separated by semicolons.
Each
variant row, however, should only include
one single value for that option.
Final Check
As you prepare your CSV for import, review all fields carefully to avoid any errors.
Help Center
The following fields cannot be left blank for any product or variant:
- title
- price
- product-option-name-#
- product-option-value-#